The language domains, listening, speaking, reading, and writing, are the 4 ways that people can interact with language. Two of these skills, speaking and writing, are described as productive skills as we create language with each of these. The other two skills, listening and reading, are receptive skills because we use these skills to receive information from an outside source.
In this post, we will focus on practicing the language domain of speaking and how Seesaw can help you meet this need.
But my students talk all day long…
If I told a kindergarten teacher that we need students to be talking more during the day, they’d be quick to remind me that their students talk. All. Day. Long. Studies have shown that between the ages of 2 and 4, a child asks upwards of 40,000 questions. So it’s only expected that children come to us ready to be involved in conversations. Speaking is just one of the four domains of language, and while many may argue that their students are talking nonstop, it’s important to evaluate how our students are speaking and if they are engaged in academic discourse.
According to TESOL Teachers, an effective speaking lesson includes the following:
- Has one or more of these purposes:
- to learn to talk about an interesting/motivating topic;
- to learn something new about others;
- to accomplish a task;
- Provides ways for students to learn the vocabulary they need to express themselves.
- Gives students a variety of opportunities to use content-specific vocabulary.
- Helps students develop communication strategies to make themselves understood.
- Scaffolds students into increasing speaking confidence and competence.
How can we practice speaking with Seesaw?
Seesaw is an amazing platform to use to help practice independent speaking skills. There are three main ways that students can practice speaking with Seesaw: using the microphone to record their screen and voice, recording using video, or recording using audio
Speaking by using the microphone
The microphone option is a great choice for when you want to record both their Seesaw page along with their voice. One great way to use this feature is when students are explaining their thinking for a math problem. Students can solve the problem and explain their steps as they work through the problem. When using this option, a pointer appears in the bottom toolbar that students can use when explaining their thoughts.
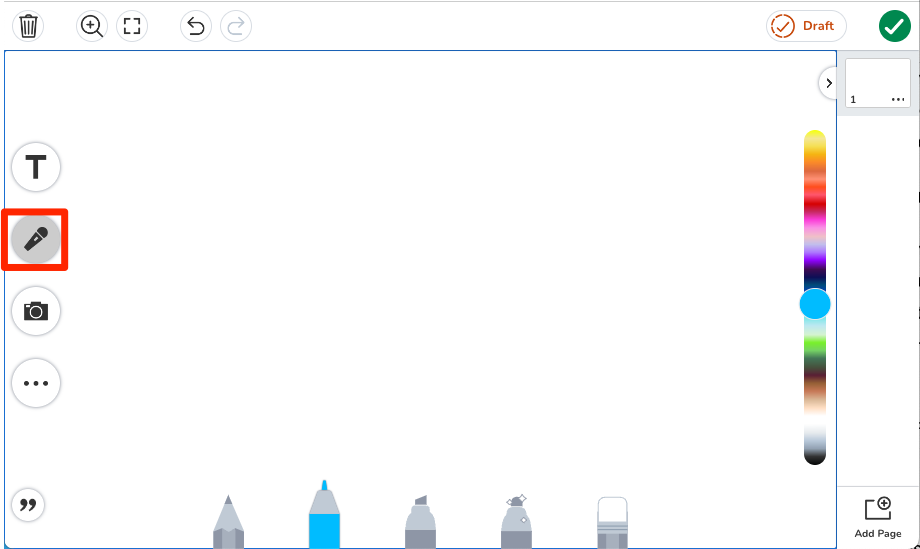
To record using the microphone in the creative canvas, tap the microphone icon. A countdown will appear on the screen and it will begin recording the screen and any audio (voice). For more help, visit the Seesaw Help Center.
Speaking by creating a video
If you want to see students as they speak, the video option is a great choice. This could be a good option for oral presentations. By allowing students to record, instead of presenting live, you eliminate the pressure of public speaking. This is especially important for our EL students as they may struggle with confidence in their speaking abilities. By recording, students are able to speak, listen, and rerecord if they hear any pronunciations that are incorrect.
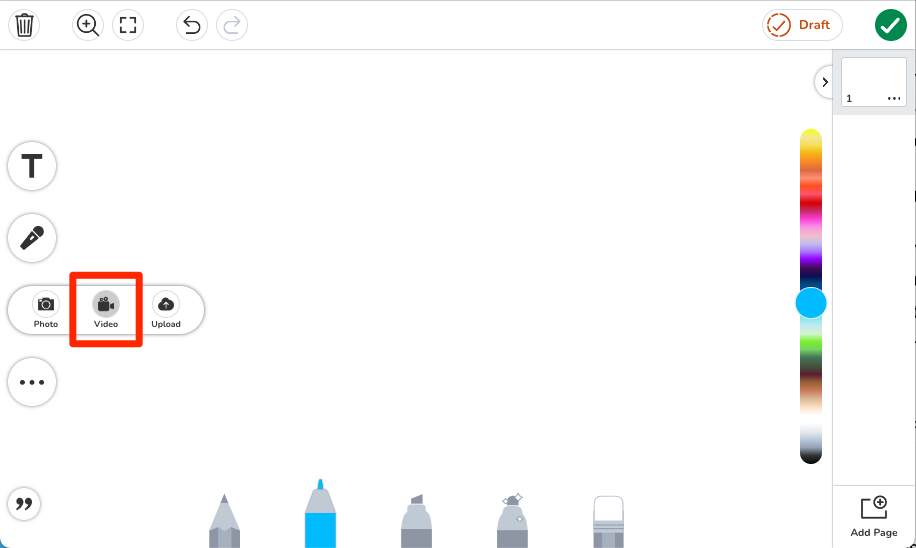
To create their own video in the creative canvas, select the camera icon > tap video > tap the camera to begin recording. Videos have a 5-minute time limit. For more help, visit the Seesaw Help Center.
Speaking by recording your voice
Students can also simply record using the add audio option. When using this feature, you can consider including sentence frames, paragraph structures, or other helpful guides for students.
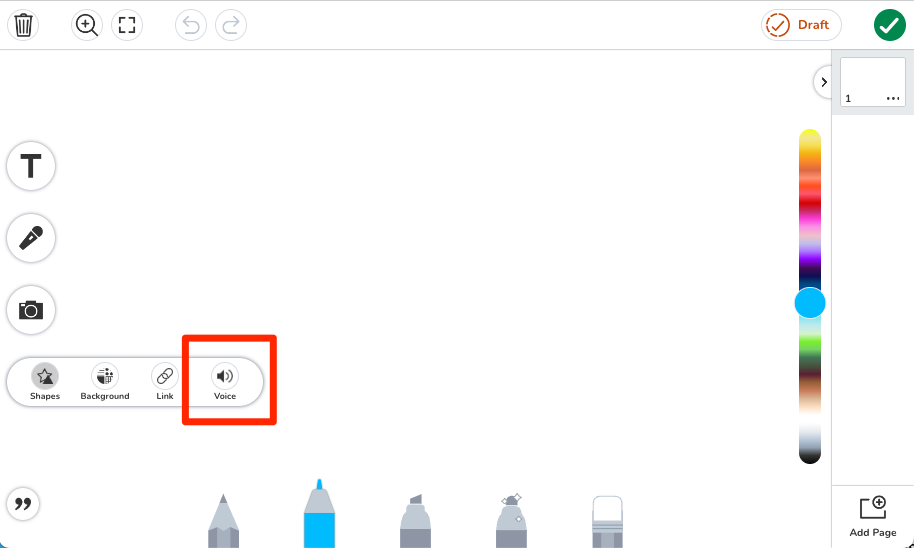
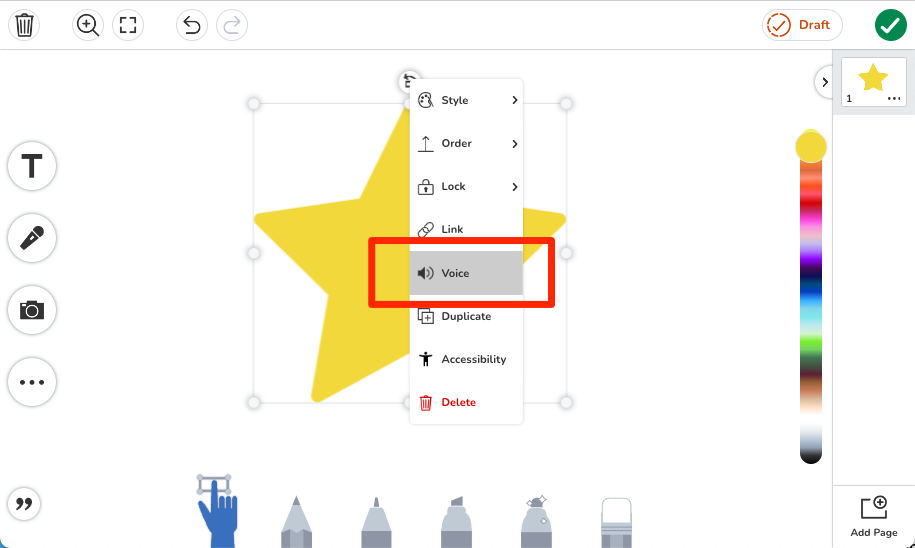
To add audio to a text box, shape, or image, select the item > tap the […] button on the item > select Voice > select Upload Audio. For more help, visit the Seesaw Help Center.
How much support do my students need?
When considering the amount of support students need to feel successful, know that all students are at different places in their speaking journey. The first thing to consider is the student’s speaking proficiency level. At Elkhart Community Schools, you can access this through PowerSchool by looking at each student’s ILP.
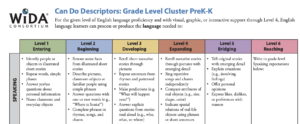
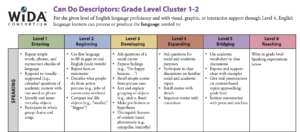
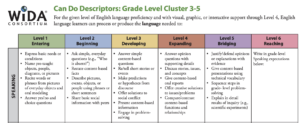
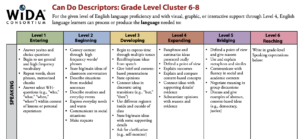
Once you know your student’s proficiency level for speaking, take a look at the WIDA Can Do Descriptors. These descriptors help you to gauge the level of support your student needs to be successful. Below are the Speaking Can Do Descriptors. You can find the originals, along with the other Can Do descriptors for the other domains by using the link above.
Consider using Seesaw’s grouping feature to add students into groups based on their speaking proficiency.
Looking to support the other language domains?
How do you support your student’s speaking abilities?
Let us know in the comments below!