Seesaw blogs are a great way to showcase the work your students are doing in the classroom. By engaging with an authentic audience of their classmates and parents, students are encouraged to complete better work and to get real feedback from their peers. Blogs can also create a space for students to share their thoughts and ideas, their special interests, and to celebrate one another. Seesaw Blogs can be used for:
- Showcasing student work (VIDEO: Seesaw Wow Work! Intro for Students)
- Responding to readings or writing prompts
- Publishing writing pieces
- Showcasing final projects
- Sharing fun creations
- Social media space
How to keep Seesaw blogs a safe space for students
Teacher Monitored: Seesaw blogs can be public on the internet or password protected. Regardless of public vs. private blogs, all student posts must be monitored by a teacher before publishing. Student comments can also be enabled, but will require teacher approval, as well.
Password Protected: By default, your blog is set to public. If you want to restrict access to your blog, you can set a password for your blog. If your blog is password-protected, anyone who visits your blog will need to enter the password before they can view any content.
Names: Teachers can control if student names are shown on the blog, but student last names are always hidden.
Digital Citizenship: Seesaw Blogs allow a great space to help discuss digital citizenship in practice. Discuss W.O.W. Work and digital citizenship with these resources.
How to Set-Up Your Class Blog
- Click the wrench in the top right corner to go to your class settings.
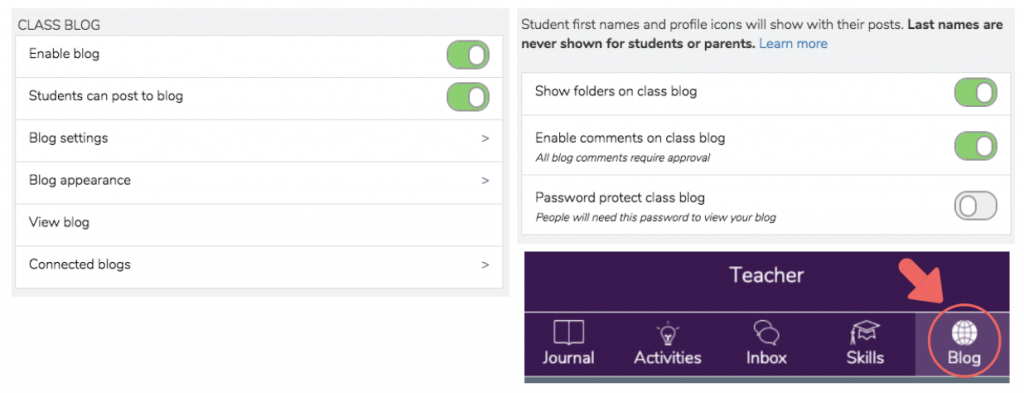
- Scroll down to the middle of the settings until you see the “Class Blog” category; toggle over “Enable blog.”
- Click “Create Public Blog” Enter a blog name and an ending URL (ex: your last name and year). Click the green check mark.
- Toggle “Enable comments on class blogs.” Click the green check mark.
You can password protect if you choose, but you will need to share the password with anyone who will access the blog, including parents. - Under “Blog appearance” you can personalize your class blog by uploading a header image for your landing page. You can also change your blog name and URL.
- All done!
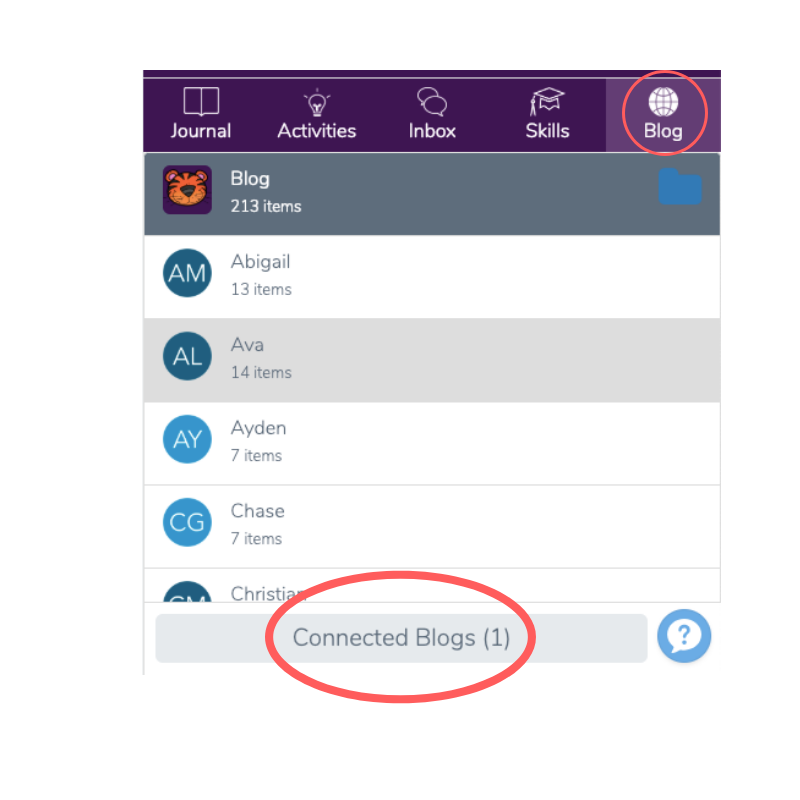
NOTE: Under “Blog settings” make sure both ‘Show folders on class blog’ and ‘Enable comments on class blog’ are turned on. - To view your blog, click on the globe icon across the top right of your teacher dashboard.

How to Post Work on Class Blog
Once the Class Blog is set up, posting student work is simple.
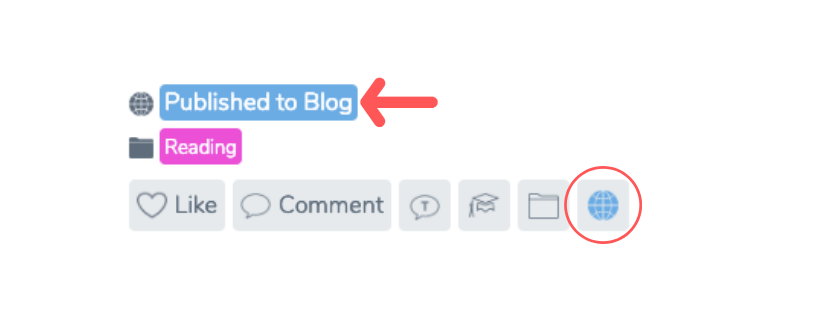
- Students and teachers can easily post any item from the Journal feed to the Class Blog by tapping the globe icon below a post
- Students can also select for an item to be posted to the Class Blog during the initial item posting.
*Remember, all work and comments are moderated and approved by the teacher before they are posted to the class blog.*
Promote Digital Citizenship
- Students can learn about and enhance their digital citizenship skills through the items they post on the Class Blog and how they comment on each others’ items
- Teach students about Wow Work! and how to leave the best comments with Seesaw’s Seesaw Digital Citizenship Guidelines and Posters
- Always remind students never to share personal information online
Example Blogs:
Ms. Mathieson’s 5th Grade Class Blog
Ms. Bean’s 5th Grade Class Blog
Ms. Paulson’s 1st Grade Class Blog
Ms. Davidson’s 2nd Grade Class Blog
Connecting with Other Class Blogs
The BEST thing about class blogs is that you can connect with other classes from around the world!
- In your “Class Settings” (the wrench) scroll down to “Class Blog.” The last subsection here is titled “Connected blogs.” Click here.
- At the bottom of the next screen you will see a button that reads “+ Connect to Blog.” Click this then enter the URL of the blog you wish to connect to.
NOTE: You only need to know the END of the URL for the blog you are connecting to. - Once entered, you can view connected blogs by clicking on the globe icon towards the top right of your teacher dashboard. Once on your blog landing page, you will see a button that reads “Connected Blogs” at the bottom of the page. Click this button to view your connected blogs. Select a connected blog to switch to.
Why Connect with Other Class Blogs?
- Students can communicate with students in other classrooms through the use of comments.
- Students share their work with an authentic peer audience and view the work of others, encouraging better work and more constructive, positive feedback.
- Students can see what and how students in other places, similar or different from where they live, learn.
*Remember, all work and comments are moderated and approved by the teacher before they are posted to the class blog.*
VIDEO: Seesaw Blogs: Connect and Collaborate via Seesaw Connected Blogs
Ready to Connect?
Seesaw has created a public spreadsheet for users to find other classes to connect to. There are classes PK-8 as well as multiple Specials classes and ESL. You can find classrooms relatively close (IN, IL, MI, WI, OH) or as far away as Singapore, Thailand, Australia, Spain, or the UK.
Find Seesaw blogs to connect with HERE!
Want to connect specifically with other classrooms within ECS? Add your information to our new Elkhart-only Seesaw Connected Blogs list below!
Connect with Elkhart Community Schools Teachers HERE!
Teacher Highlight: Mrs. O’Brien
We use a roster class in 6th grade as a social media platform. It is a great way to get kids feet wet in the Social Media world, in a very monitored setting. There are strict rules and guidelines students must follow in order to be able to post and stay in the group. We turned on the settings that allow students to “like” and comment on each other’s work. This encourages students to share and interact with one another. We also turned on the setting that a teacher must approve all new posts and comments. This allows for a safe space for all of our students. All the 6th grade teachers are co-teachers so everyone can help approve items and see what things students are sharing, what they are interested in, and continue to build community with all students in the grade level.
Below are some examples of how we use “Feeser Faces” to help students to build community. Students share classwork, personal interests, have open discussions, share artwork, and celebrate one another!

Need more help on Seesaw?
Find our helpful Seesaw resources here on the Digital Learning Resources for Staff page.
Browse the Seesaw Help Center at help.seesaw.me.


1 Response
[…] class blog so that students can appreciate each others hard work! Learn more about the seesaw blog, here. Be sure to talk and teach the ideas behind sustainability before assigning this […]