Many people leave emails in their inbox, sometimes totaling 15,000 or more! This creates clutter and makes it hard to find important messages. Using labels to organize emails and archiving those that aren’t needed immediately can transform your inbox into an organized, efficient workspace, making you a true Gmail pro!
You will go from 15,000 to 0 emails and also create a process to help keep your Gmail clean and pretty! Look at how organized and amazing your email can look!

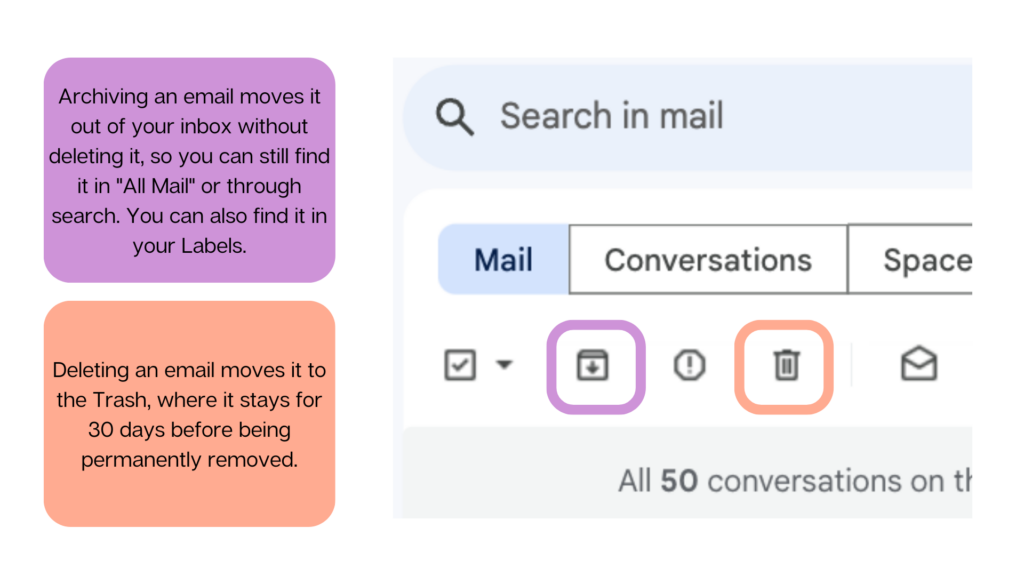
One thing to note before you go through this process: archiving and deleting emails are two different things. Let’s look at the difference between Archiving and Deleting.
Step 1 | Brainstorming Labels
In Gmail, labels are like folders: Places to store email messages. Think about what labels would help you organize all of your emails? If this is your first time clearing your email out, I suggest using year labels such as 2023-2024 School Year and so on.
I currently have the following labels, but I add more when situations arrive!
- To do
- Need to reply
- Questions
- Tech Information
- Conferences
- 2022-2023 School Year
- 2023-2024 School Year
Go through your email inbox and begin to ponder which labels you may need so everything has a place. When in doubt, remember what Marie Kondo says: “Only keep it if it ‘sparks joy’.”
Step 2 | Creating Labels
Now that you have an idea on which labels you need, you will need to create them.
On the far left side of your Gmail screen scroll all the way down, click more, and then scroll alllllll the way down and click the + create label link. Go ahead and add your Labels!
Don’t worry, the next step will hide all the system labels so only the beautiful labels you created will be seen
Step 3 | Hiding Menu Items
Go to ⚙ manage labels, which is right above the create new label link (see the step above). Next, hide all the unwanted tabs such as “Social, Updates…”.
Click show for all the labels you created. The video to the right shows what it should look like in the end.
If you decide to hide all the system labels, your labels will be on top! If you need to look at a draft or review a recently sent email, click on more and it will show you the hidden system labels.
Step 4 | Color Coding
Now for the the fun part! You get to color code all your labels. On the far left if you hover over the label you will see three dots. Click on the three dot menu next to a label to change its color.
Step 5 | Filtering and Archiving
If you need to start labeling broadly so you can clean your inbox out quickly, I suggest you go by dates. Make sure you have a label with the date, such as (2023-2024). You can also go through this same process with keywords or emails from certain people.
Type after:2023/08/01 before:2024/09/01 in the search bar to search within August 2023 to August 2024
Then click on the little box right under the search bar (pictured over to the right). This allows you to select all of the emails related to the search. However, if the search yields more than 50 you will see a pop up asking if you want to select all of the emails (pictured below).

“All 50 conversations on this page are selected. Select all conversations that match this search” Clicking on the blue words will select all the emails correlated with your search.

Once you have all the emails selected, click on the label you want to use (The video below goes over this as well). After each one is labeled you will see a color label on the email and also a gray label that says ‘inbox’. As long as each email has a label other than inbox you can archive the emails and they will stay in the label but be removed from the inbox. Again, labels are like folders for the emails.
You can begin to label broadly to empty your inbox and then when new emails arrive, label them right away. When you are done with them, you can press the archive button and they will be placed in a “folder”. You can add multiple labels to one email, if needed.